How to Use Infinity to Successfully Plan Projects
If Pinky and the Brain had a better way to plan how to take over the world, our planet would have been controlled by two laboratory mice. Luckily for us, Infinity didn’t exist at the time, but this doesn’t mean that you shouldn’t get a chance to plan your projects with less stress.
We’ll go through the basics of project planning and show how to use Infinity to go through the necessary steps, organize work, manage resources, and collaborate with your team all in one place.
What Are the Basic Steps in Project Planning?
There are no rules set in stone when it comes to planning a project, but most project managers would agree that these are the steps you have to go through:
Step 1: Define the Project
First things first, you need to take an idea to the next level and elaborate on it. It is important to explain the problem you are trying to solve, the solution, and the general outcome of the project.
Step 2: Discuss with the Stakeholders
In this step, you run the project past everyone who gets a say in whether it will be approved or not. The stakeholders may suggest changes to the project before they greenlight it.
Step 3: Create Project Goals and KPIs
You have to create clear goals and metrics you will track to measure the success of your project. Aim for SMART goals and be as specific as possible when defining them.
Step 4: Define Project Deliverables
This step is extremely important in order to avoid scope creep—you need to have clear deliverables to prevent stakeholders from changing requirements mid-process and overloading your team.
Step 5: Set Project Timeline and Milestones
Set important project milestones and carefully plan time estimates for each phase of the project.
Step 6: Assign Team Members
Decide on the team structure and the people responsible for delivering different tasks.
Why Use Infinity To Plan Projects?
Having the right tool for project planning can make all the difference in your success rate. Infinity makes it easy to:
- Share and discuss ideas, goals, and strategies with your team and the stakeholders,
- Plan every phase of the project in a single place,
- Manage deadlines and efficiently allocate resources,
- Map out the project scope to clearly communicate where you’re headed,
- Assign tasks to team members in a few clicks,
- Discover possible issues and bottlenecks ahead of time,
- Get real-time updates on project and task status and progress.
How to Make a Project Plan in Infinity
The easiest way to plan a project in Infinity is to start with our Project Planning template. We have created this template based on our internal processes so you can try a proven method of organizing your work.
The template comes preloaded with mock data so you can learn how everything works through examples or draw inspiration for your own projects. You can play around with existing tasks and try out different views and customization options.
We have divided the project planning process into four parts: projects, tasks, people, and time. The idea behind it is to start from the top and work your way down by breaking down large initiatives into small tasks, then manage the people responsible for the delivery of each task and create time estimates.
This doesn’t mean that these four steps are not intertwined—more often than not, you’ll do two or more steps in parallel. The only reason we have separated the four is to give you a better idea about the features you can use to better manage your projects.

1. Manage Projects
Once you have a clearly defined project, you have to run it by the stakeholders and get their approval. If everything goes well, the next step is to set project goals and KPIs you’ll use to determine if the project was a success. When everything is set, it’s time to create project deliverables.
In Infinity, you can use the Description field to provide a short overview of the project and the desired outcome. You can add a progress bar to each project to visually track its status.

There are several ways you can view your projects, but the Columns view may be the best suited. Simply use the existing Project Status label to organize projects by status (Planned, In Progress, Waiting, On Hold, and Completed). If you want to add or remove a phase depending on your management style, you can do it in a few clicks.
Once the outline of the project is finished, it’s time to break it down into tasks. Infinity lets you connect tasks to the project they belong to so you can easily manage them in one place and never lose sight of what needs to be done.
2. Manage Tasks
It’s easier to deliver projects, large and small, if you divide them into actionable tasks and assign them to the right team members. The flexible structure of Infinity combined with different views lets you organize your tasks using various methodologies like Scrum, Kanban, or Scrumban.
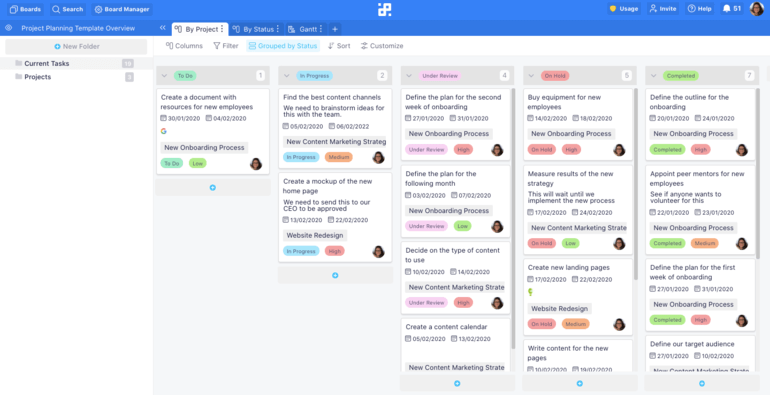
One popular way of task management in Infinity is to assign a status to each task, have separate columns for each status phase, and move tasks between columns as they progress. Our Project Planning template comes with 5 status labels (To Do, In Progress, Under Review, On Hold, and Completed), but you can use the Add New Label button to create a custom label or simply rename or delete existing ones.

Let’s go through an example to see how this method works. Imagine that you have to create a mockup of the new homepage, which is part of the company website redesign project. Once you have brainstormed the ideas with the designers and agreed on what needs to be done, you can create a task, fill out the details, assign it to the responsible team member(s), and label it as “To Do”. Whoever is assigned to the task will change the status to “In Progress” as soon as they start working on it, which will automatically move the task to the next column.
From there, the task can move to one of the remaining three columns depending on the outcome. Let’s say that the assigned designer gets sick and has to take a week off. The team lead will change task status to On Hold to communicate that there is a delay. If everything goes smoothly, once the task is done it can be either marked as Completed or Under Review if it needs to be approved by someone else first.
3. Manage People
Anyone who’s ever been in charge of planning a project knows how hard it can be to manage a team of people. Having a project planning tool like Infinity makes it easier to fairly divide the workload between people, keep track of everyone’s progress, and communicate your thoughts and feedback, all in one place.
Every time you create a task, you can assign it to one or multiple people. Some tools only let you assign one person per task, which makes things complicated when there are several people involved but you don’t want to create microtasks for each small step. For instance, you want to publish a new blog post on your website. You can create a single task, add a checklist with subtasks—write the post (content writer), proofread and edit the post (content lead), create a featured image for the post (designer), and assign it to three people.
There are several ways team members can communicate in Infinity. You can add notes and comments to each task, using @ to mention people and get their attention. If you need the team to agree on the best design, idea, or solution, you can add a vote attribute and find out what everyone thinks. Assignees can add links and attachments to share their work with others, which can then be reviewed and discussed.

A great way to oversee your team without micromanaging is to use the Columns view to show tasks by assignee. You can create tabs for each team member and use the Filter feature to show only their tasks in each tab. This way, everyone on the team has a place where they can manage their tasks and you can learn what people are working on with a single click.
Of course, you still have the main tab with all tasks combined, so you can take action if someone doesn’t have a task in progress or has their tasks put on hold.

4. Manage Time
Finally, what good is a perfectly planned project if you fail to deliver it on time? Deadlines are often what dictates the whole process and you should pay extra attention to time management when it comes to planning.
In a perfect world, every task would be finished on time. In reality, unexpected things happen: people take vacations or get sick, clients take a long time to provide feedback or vital information, time estimates turn out to be wrong. This is why you should try to have some wiggle room in case things go south.
Infinity’s Project Planning Template comes with a bunch of time-related attributes you can use to plan your projects. These are the most common ones:
- Start Date—the date you started working on the task.
- Due Date—the deadline for the task.
- End Date—the actual date you have finished the task.
- Created At—not to be confused with Start Date. This is the date when you created the task, and it might take some time until someone actually starts working on it.
- Updated At—a great way to inform the rest of the team when you have updated the task with additional information or applied changes to your work based on the feedback you received.
Like with any other attribute in Infinity, you can create custom time attributes if you need them.
There are currently five time formatting options to choose from if you click Edit attribute settings:
- DD/MM/YYYY—for instance, 31/03/2022
- MM/DD/YYYY—for instance, 03/31/2022
- Month-date—for instance, Mar 31st
- YYYY/MM/DD HH:MM:SS—for instance, 2022-03-31 12:30:00
- Month, date, year—for instance, Mar 31st 2022
Tracking projects in a Gantt chart
Gantt charts are bar charts that have been around for over a century, but were popularized in the 80s and 90s when the development of computer software allowed users to easily create and edit them. Nowadays, it’s hard to imagine a project planning software without a Gantt feature.
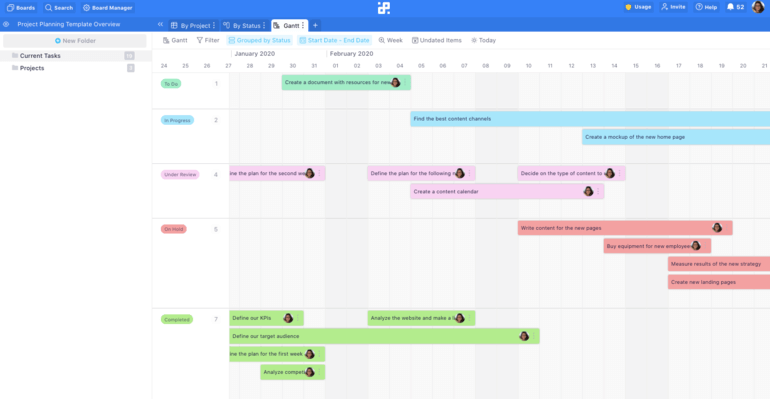
If you check out Infinity’s Project Planning template, you’ll see that there is already a tab called Gantt. We have set it up for you so you can simply add new tasks that will show up in the timeline when you add start and end dates. No need to worry if you have to reschedule the task for later or change the deadline—you can use drag&drop to shorten or lengthen the bar to reflect date changes.

Using the Calendar view
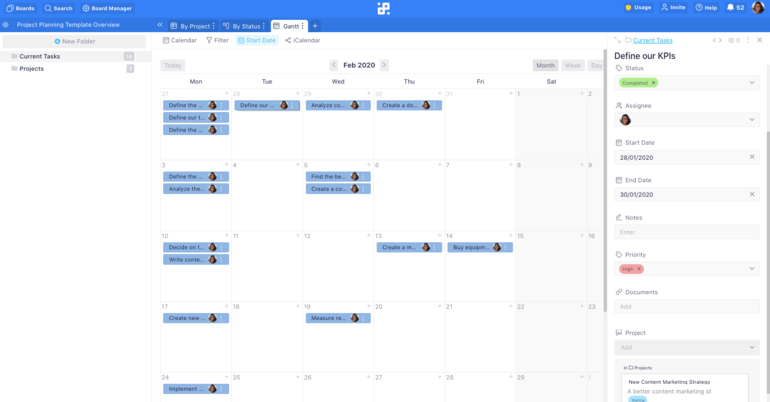
Alternatively, you can switch to the Calendar view to get a visual of all tasks by the day of the month. If, like us, you use some kind of Agile approach and have events like daily standup meetings, sprint planning, etc. you’ll find it easy to organize all meetings in a calendar.
You can use Infinity to schedule calls with clients and stakeholders that are part of your project development. Simply use a different color to label these calls and set them apart from internal meetings.
Finally, the Calendar view lets you quickly check in on upcoming deadlines to make sure you’re on track and not missing anything.

Conclusion
Now that we’ve covered the four most important aspects of planning projects, you’re ready to apply them in practice. Do you want to learn more about the ways Infinity can simplify your project planning processes? Feel free to schedule a 1-on-1 demo call or email us at team@startinfinity.com.


